
how to assemble flower wall?
To assemble a flower wall, start by gathering the materials you will need, such as a sturdy backdrop, floral foam or chicken wire, and a variety of fresh or artificial flowers. Attach the floral foam or chicken wire to the backdrop securely, ensuring it is evenly distributed. If using floral foam, soak it in water beforehand to keep the flowers hydrated.
Next, trim the stems of the flowers to your desired length and begin inserting them into the foam or weaving them through the chicken wire. Start from the bottom and work your way up, layering the flowers to create a full and lush look. Consider using a mix of different flower types, colors, and sizes for visual interest.
Continue adding flowers until the entire backdrop is covered, making sure to fill any gaps or empty spaces. Step back occasionally to assess the overall appearance and make adjustments as needed. Once finished, hang or prop up the flower wall in your desired location, ensuring it is secure and stable.
Remember to mist the flowers with water regularly if using fresh blooms to keep them looking fresh and vibrant.
1、 Selecting the right flowers and foliage for your flower wall
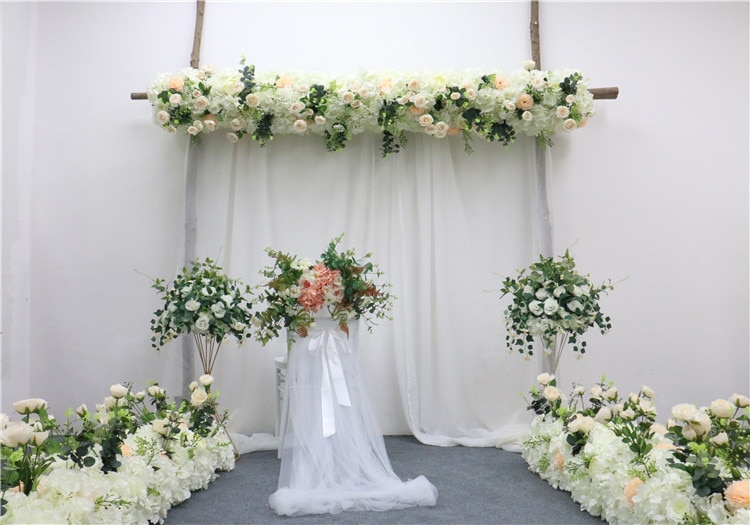
How to Assemble a Flower Wall:
Creating a stunning flower wall can add a touch of elegance and beauty to any event or space. Here are some steps to help you assemble your own flower wall:
1. Selecting the right flowers and foliage: Choose flowers and foliage that complement your event theme or desired aesthetic. Consider the color palette, texture, and size of the flowers. Popular choices include roses, hydrangeas, peonies, and greenery like eucalyptus or ferns. It's also important to consider the durability of the flowers, as some may wilt faster than others.
2. Preparing the flowers: Trim the stems of the flowers at an angle and remove any excess leaves or thorns. Fill buckets with water and add flower food to keep the blooms fresh.
3. Creating the base: Start by attaching a sturdy frame or panel to the wall where you want the flower wall to be. This can be made of wood, wire mesh, or even a pegboard. Ensure that the frame is securely attached to the wall.
4. Attaching the flowers: Begin by attaching the foliage to the frame using floral wire or zip ties. This will create a lush backdrop for the flowers. Then, start attaching the flowers to the frame, working from the bottom up. Use floral wire or hot glue to secure the stems to the frame. Be mindful of the spacing and arrangement to create a balanced and visually appealing design.
5. Maintaining the flower wall: Mist the flowers with water regularly to keep them hydrated and fresh. Remove any wilted or damaged flowers to maintain the overall appearance.
In recent years, there has been a growing trend of using artificial flowers for flower walls. High-quality silk or foam flowers can provide a realistic look while offering the advantage of longevity and easy maintenance. This option allows for the creation of a flower wall that can be reused for multiple events.
Remember, assembling a flower wall requires time, patience, and attention to detail. With the right flowers, proper preparation, and careful arrangement, you can create a stunning flower wall that will be the highlight of any space or event.

2、 Preparing the base structure for your flower wall
Preparing the base structure for your flower wall is an essential step in assembling a beautiful and sturdy display. Here is a step-by-step guide on how to do it:
1. Measure and mark: Start by measuring the area where you want to install the flower wall. Use a measuring tape to determine the height and width of the space. Mark the measurements on the wall using a pencil or masking tape.
2. Choose the base material: Decide on the base material for your flower wall. You can use a wooden frame, wire mesh, or even a pegboard. Consider the weight of the flowers and the overall look you want to achieve.
3. Install the base structure: Attach the base material to the wall using screws, nails, or adhesive hooks. Make sure it is securely fastened to the wall to support the weight of the flowers. If using a wooden frame, assemble it according to the measurements and attach it to the wall using brackets.
4. Add support brackets: Depending on the size and weight of your flower wall, you may need to add additional support brackets. These can be installed at regular intervals along the base structure to provide extra stability.
5. Prepare the surface: Before attaching the flowers, make sure the base structure is clean and smooth. Remove any dust or debris and ensure that the surface is even.
6. Start attaching the flowers: Now comes the fun part! Begin attaching the flowers to the base structure using floral wire, hot glue, or zip ties. Start from the bottom and work your way up, layering the flowers to create a lush and full look.
Remember to consider the latest trends and styles when assembling your flower wall. Incorporate different textures, colors, and sizes of flowers to create a visually appealing display. Additionally, consider using artificial flowers for a longer-lasting and low-maintenance flower wall.
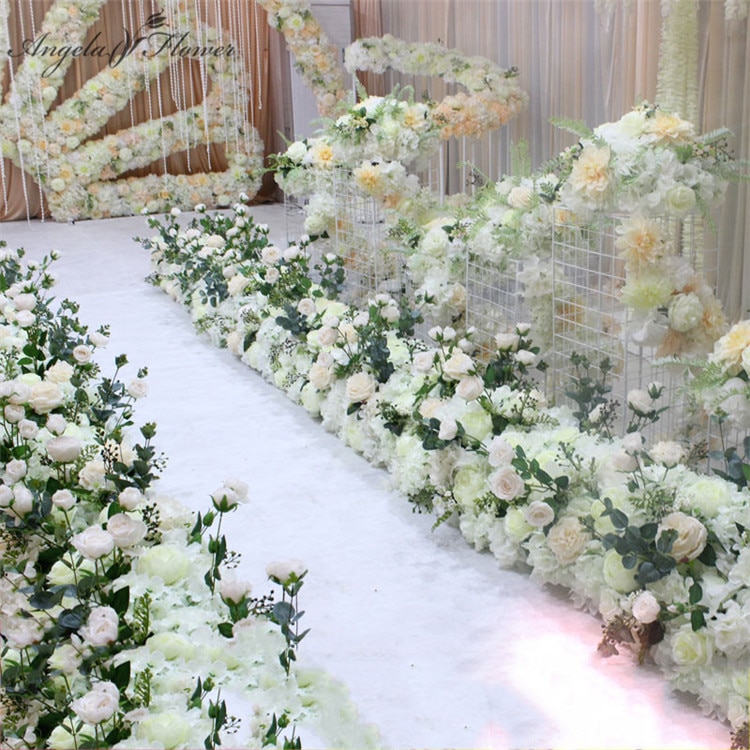
3、 Attaching the flowers and foliage to the wall
To assemble a flower wall, you will need to follow a few steps. The first step is to gather all the necessary materials, including a sturdy wall or backdrop, flowers, foliage, floral foam or wire, scissors, and adhesive hooks or tape.
Once you have all the materials ready, start by attaching the flowers and foliage to the wall. You can do this by using floral foam or wire to secure the stems of the flowers and foliage to the wall. If you are using floral foam, soak it in water for a few minutes before attaching it to the wall. Then, insert the stems of the flowers and foliage into the foam, making sure they are securely in place.
If you prefer to use wire, cut small pieces of wire and wrap them around the stems of the flowers and foliage. Then, twist the wire tightly to secure them to the wall. Make sure to space out the flowers and foliage evenly to create a balanced and visually appealing arrangement.
Another option is to use adhesive hooks or tape to attach the flowers and foliage directly to the wall. This method is less invasive and can be easily removed without damaging the wall. Simply attach the hooks or tape to the back of the flowers and foliage and press them firmly onto the wall.
As you assemble the flower wall, consider the latest trends and styles. For example, incorporating a variety of flower types and colors can create a vibrant and eye-catching display. Additionally, adding greenery and foliage can provide texture and depth to the arrangement.
Overall, assembling a flower wall requires careful placement and attention to detail. By following these steps and considering the latest trends, you can create a stunning flower wall that will enhance any event or space.
4、 Creating a balanced and visually appealing arrangement
To assemble a flower wall, it is important to focus on creating a balanced and visually appealing arrangement. Here are some steps to help you achieve this:
1. Choose a variety of flowers: Select a mix of different types of flowers to add depth and texture to your flower wall. Consider using flowers of different sizes, shapes, and colors to create visual interest.
2. Plan the layout: Before assembling the flower wall, plan the layout by arranging the flowers on a flat surface. This will help you visualize how the final arrangement will look and make it easier to make any necessary adjustments.
3. Start with a base: Begin by attaching a sturdy base to the wall, such as a wire mesh or a wooden frame. This will provide support for the flowers and ensure they stay in place.
4. Attach the flowers: Use floral wire or adhesive to attach the flowers to the base. Start by placing larger flowers at the bottom and gradually work your way up, adding smaller flowers and foliage to fill in any gaps.
5. Create a balanced composition: Pay attention to the placement of the flowers to create a balanced composition. Distribute the colors and shapes evenly throughout the arrangement to avoid any areas looking too crowded or sparse.
6. Add depth and dimension: To add depth and dimension to the flower wall, vary the heights of the flowers. Use floral foam or other materials to elevate some flowers and create a layered effect.
7. Regularly maintain the arrangement: To keep your flower wall looking fresh, regularly mist the flowers with water and remove any wilted or damaged blooms.
In terms of the latest point of view, there has been a growing trend towards incorporating sustainable and locally sourced flowers in flower walls. Many people are now opting for eco-friendly options, such as using flowers that are in season and avoiding the use of floral foam, which is not biodegradable. Additionally, some designers are experimenting with unconventional materials, such as dried flowers or even recycled materials, to create unique and eco-conscious flower walls.


Leave your comment